Why Bedside Cable Management Matters More Than You Think
A tangled nest of charging cables beside your bed is more than just an eyesore. It affects your daily routine, your sleep environment, and even the longevity of your devices. When cables are constantly pulled, bent, and stepped on, internal wires fray and connectors loosen — leading to unreliable charging and premature device failure.
Beyond functionality, a clean bedside setup contributes to a calmer mental state. Your bedroom should be a sanctuary, and visual clutter has been linked to increased stress and poorer sleep quality. Investing a few hours in a proper cable management system pays dividends in both aesthetics and peace of mind.
If you're still in the planning phase of your bedroom setup, our nightstand placement guide will help you position your furniture to minimize cable runs in the first place. And if you're selecting a nightstand with built-in charging capabilities, our guide to nightstands with charging stations covers everything you need to know.
The Core Components of an Effective Bedside Cable System
Before purchasing any products, it helps to understand the four pillars of bedside cable management. Every solution you implement will address one or more of these components:
1. Power Access
You need reliable, accessible power near your bed. This could be a wall outlet, a surge protector, or a USB charging hub. The key is positioning it so that devices can charge without long, visible cable runs across your floor or furniture.
2. Cable Routing
This is how cables travel from the power source to your devices. Good routing keeps cables hidden, secured, and protected from damage. Options include adhesive clips, cable channels, under-furniture trays, and wall-mounted raceways.
3. Cable Containment
Even with good routing, you'll have excess cable length and multiple cords to manage. Containment solutions — like cable sleeves, boxes, and organizers — bundle everything into a single, tidy package.
4. Device Organization
Finally, you need a place for your devices themselves. This is where bedside catchall trays and nightstand organizer inserts come into play, giving each device a dedicated spot.
Practical Solutions for Every Bedside Setup
Solution 1: The Under-Nightstand Cable Tray
An under-nightstand cable tray is one of the most effective and affordable solutions. It's a shallow, open-top tray that mounts to the underside of your nightstand or sits on the floor beneath it. All your cables, power strips, and charging bricks go inside, completely hidden from view.
This approach works best with nightstands that have at least 3–4 inches of clearance beneath them. If your nightstand sits flush with the floor, consider wall-mounted solutions instead. For those with floating nightstands, the open space beneath is perfect for a slim cable tray or wall-mounted cable box.
Ideal for: Renters (no wall damage), anyone with a standard nightstand, and setups with multiple devices.
Typical cost: $20–$60
Solution 2: Wall-Mounted Cable Raceway
A cable raceway is a decorative channel that mounts to your wall, hiding cables behind a paintable or neutral-colored cover. This solution is ideal when your outlet is positioned away from your nightstand, or when you want to route cables cleanly from a wall-mounted TV or light fixture.
Modern raceways are available in various profiles — from slim, self-adhesive channels to larger, screw-mounted trunking that can hold multiple thick cables. They're paintable, so you can match them to your wall color for a nearly invisible installation.
Ideal for: Permanent installations, wall-mounted lights, and situations where floor access is limited.
Typical cost: $15–$50
If you're planning to add a wall-mounted reading light as part of your setup, our guide to wall-mounted reading lights covers installation and cable considerations.
Solution 3: Cable Management Box
A cable management box is a simple, elegant container that sits on the floor or on a shelf, holding your power strip and excess cable. Most feature ventilation slots to prevent overheating and a lid that keeps everything concealed.
These boxes are particularly useful when your power strip sits on the floor beside your nightstand. They protect the strip from dust and accidental kicks, and they keep the visual clutter contained. Some models include built-in cable exits on multiple sides, making routing easy.
Ideal for: Floor-level power strips, quick setups, and anyone who wants a no-installation solution.
Typical cost: $15–$35
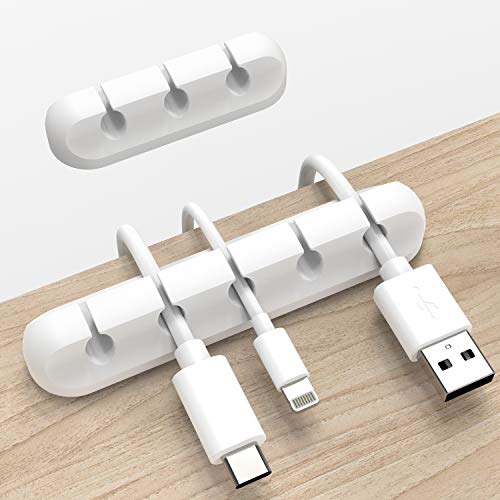
Solution 4: Adhesive Cable Clips and Guides
The simplest and cheapest starting point. Adhesive cable clips attach to the back of your nightstand, the wall, or the floor trim, holding individual cables in place along a predetermined path. They're perfect for keeping a single charging cable accessible without letting it fall behind the furniture.
For a slightly more polished look, use adhesive cable guides with a channel design — these hold multiple cables and create a cleaner line. They're removable without damaging most surfaces, making them rental-friendly.
Ideal for: Single-cable setups, temporary solutions, and supplementing other systems.
Typical cost: $8–$20
Solution 5: Cable Sleeves and Tubes
A cable sleeve is a flexible tube that bundles multiple cables into a single, neat line. If you have three or four cables running from your outlet to your nightstand, a sleeve transforms them into what looks like one thick cord — dramatically reducing visual clutter.
Sleeves are available in mesh, neoprene, and braided styles. Mesh sleeves are the most common and offer the best flexibility. For a more premium look, braided sleeves in neutral tones blend seamlessly with most decors.
Ideal for: Bundling multiple cables on a single route, setups with visible cable runs.
Typical cost: $10–$25
Solution 6: Smart Charging Stations with Integrated Management
If you're in the market for a new nightstand, consider one with built-in charging and cable management. Many modern designs include USB ports, wireless charging pads, and internal cable channels that keep everything hidden.
Our guide to nightstands with USB ports explores the best options for integrated charging. Pair one of these with a smart bedside lighting setup, and you can create a fully connected, cable-free bedside environment.
Ideal for: New furniture purchases, tech-forward users, and anyone who wants a permanent solution.
Typical cost: $150–$600 (for the nightstand itself)
Comparison: Which Cable Management Solution Is Right for You?
Use this table to quickly evaluate your options based on your setup, budget, and installation preferences.
| Solution | Best For | Installation | Budget | Visibility |
|---|---|---|---|---|
| Under-Nightstand Tray | Standard nightstands | Easy | $20–$60 | Fully hidden |
| Wall Raceway | Permanent setups | Moderate | $15–$50 | Nearly invisible |
| Cable Box | Floor power strips | None | $15–$35 | Hidden container |
| Adhesive Clips | Quick fixes | None | $8–$20 | Semi-visible |
| Cable Sleeve | Bundling cables | None | $10–$25 | Neat single line |
| Smart Nightstand | New purchases | N/A | $150–$600 | Fully integrated |
Step-by-Step: Building Your Bedside Cable Management System
Follow this sequence for a professional-grade result that lasts.
Step 1: Audit Your Devices and Cables
Before buying anything, take inventory. Count every device that needs power at your bedside: phone, tablet, smartwatch, e-reader, lamp, alarm clock, white noise machine, and so on. Note the cable type and length for each. This audit determines how many ports, how much containment, and what routing path you need.
Step 2: Choose Your Power Source
If your wall outlet is inconveniently placed, a surge protector with a long cord is your best friend. Look for one with a flat plug that sits flush against the wall, and ideally with USB ports built in to reduce the number of charging bricks. Position it under your nightstand or inside a cable box.
For those who want to minimize visible hardware, a nightstand with a built-in charging station eliminates the need for a separate power strip entirely.
Step 3: Plan Your Cable Routes
Trace the path each cable will take from the power source to the device. Keep cables away from high-traffic areas where they might be stepped on. Route them along the back of the nightstand, along baseboards, or through a wall raceway. Avoid sharp bends, which can damage internal wires over time.
Step 4: Install Your Routing and Containment
Start with the most permanent elements first: wall raceways, under-nightstand trays, and cable boxes. Then add adhesive clips to secure individual cables along their routes. Finally, use sleeves to bundle cables that share a path. Test everything before finalizing — make sure each device can reach its charging spot comfortably.
Step 5: Organize Your Devices
With cables managed, give each device a home. A bedside catchall tray keeps your phone, watch, and keys in one place. For drawer-based storage, nightstand drawer dividers prevent devices and accessories from sliding around. If you read before bed, a bedside book holder keeps your current book accessible without adding to surface clutter.
Bedside Cable Management Checklist
- Count all devices and identify cable types
- Choose a power source (surge protector, USB hub, or built-in charging)
- Plan cable routes away from foot traffic
- Install permanent routing (raceway or under-nightstand tray)
- Add adhesive clips for individual cable security
- Bundle shared-path cables with a sleeve
- Contain excess cable and power strips in a box or tray
- Organize devices with trays, dividers, or holders
- Label cables if you have many similar ones
- Test all connections and adjust for comfort
Special Considerations for Different Nightstand Types
Floating Nightstands
Floating nightstands offer a unique advantage: the open space beneath them is perfect for a wall-mounted cable box or a slim under-mount tray. However, you'll need to route cables through the wall or along the wall surface to reach the floating unit. A wall raceway that runs from the outlet to the underside of the nightstand is the cleanest solution.
Open-Shelf Nightstands
With open-shelf nightstands, there's nowhere to hide cables inside the furniture itself. Use a cable box on the shelf or floor, and route cables along the back edge of the shelf using adhesive clips. A cable sleeve in a color that matches the nightstand finish helps the cables blend in.
Nightstands with Drawers
Drawer-style nightstands, especially two-drawer or three-drawer models, give you the option of drilling a discreet hole in the back panel to route cables into a drawer. This is an advanced technique but yields an incredibly clean result — your charging devices live inside the drawer, completely out of sight. Just ensure proper ventilation to prevent heat buildup.
Corner Nightstands
Corner nightstands often sit near wall junctions, which can actually simplify cable management. You can route cables along the corner where two walls meet, using a corner-friendly raceway or adhesive clips. The corner also provides a natural hiding spot for a floor-level cable box.
Choosing Cables and Accessories That Last
Not all cables are created equal. For bedside use, prioritize cables with braided nylon or reinforced connectors. These withstand the daily plugging and unplugging that bedside cables endure. Look for cables rated for at least 3A charging if you're powering tablets or fast-charging phones.
When selecting a surge protector, choose one with a joule rating appropriate for your devices. For a bedside setup with phones and tablets, a 600–1000 joule rating is sufficient. If you're also powering a lamp or small appliance, consider a higher rating.
For adhesive solutions, look for clips and guides that use 3M VHB tape or comparable high-strength adhesives. These hold up better in warm bedroom environments and leave less residue when removed. If you're concerned about surface damage, our guide to sticky residue removal covers safe cleanup methods.
Maintaining Your Cable Management System
A cable management system isn't a one-time project. Dust accumulates on cables and inside boxes, and devices change over time. Set a reminder every three to six months to:
- Dust or vacuum cable boxes and trays
- Check adhesive clips for loosening
- Inspect cables for wear, especially near connectors
- Remove cables for devices you no longer charge at your bedside
- Re-tighten any loose raceway or tray mounts
Regular maintenance keeps your system functional and extends the life of your cables. For general nightstand upkeep, our nightstand care and maintenance hub is a comprehensive resource.
Frequently Asked Questions About Bedside Cable Management
If there's no gap behind your nightstand, use a flat wall raceway that sits flush against the wall. Route cables from the outlet up to the raceway, then along the wall to the side or top of the nightstand. Adhesive clips can secure cables along the raceway and to the back edge of the nightstand. Alternatively, a cable management box placed beside the nightstand on the floor can contain the power strip and excess cable.
Yes, provided the box is designed for that purpose and has adequate ventilation. Never use a sealed, non-ventilated container. Look for cable boxes with ventilation slots or mesh panels. Also, avoid daisy-chaining power strips, and ensure the total load doesn't exceed the strip's rating. If the box feels warm to the touch, improve ventilation or reduce the load.
For wall-mounted lights, a wall raceway is the cleanest solution. Run the raceway from the light's mounting point down to the nearest outlet, following the wall's vertical lines. If the light is hardwired, the cable is already hidden inside the wall — in that case, you only need to manage the switch cord or any exposed wiring at the outlet. Our guide to wall-mounted reading lights covers installation details.
Count your USB-powered devices and add one or two extra ports for future needs. A typical bedside setup includes a phone, tablet, and smartwatch — so 4–6 ports is a comfortable range. If you and a partner share the bedside area, double that. Many modern surge protectors include both USB-A and USB-C ports, which is ideal for covering all device types.
Standard adhesive clips are designed for thin charging cables (phone, tablet). For thicker cables — like those for laptops or grounded lamps — use screw-mounted clips or larger adhesive clips rated for higher weight. Clean the surface with rubbing alcohol before applying adhesive clips for maximum hold. Avoid applying them to textured or dusty surfaces.
Absolutely. Adhesive cable clips, cable boxes, under-nightstand trays, and adhesive raceways all provide damage-free solutions. For renters or anyone hesitant to drill, these options deliver excellent results. The key is choosing high-quality adhesive products and preparing surfaces properly before installation.
Building a Complete Bedside Ecosystem
Cable management is one piece of a larger puzzle. A truly functional and beautiful bedside area combines several elements working together. Once your cables are managed, consider these complementary upgrades:
- Lighting: Dimmable bedside lighting or touch-control bedside lamps add functionality and ambiance without adding cable clutter if you choose models with integrated charging.
- Organization: Organizer inserts and catchall trays keep small items accessible and tidy.
- Protection: Non-slip pads keep your nightstand stable, and coasters protect the surface from drink rings.
- Safety: Anti-tip straps are essential if you have children or pets, especially with taller nightstands.
Explore our full setup and accessories hub for a complete overview of bedside optimization products and techniques.
Final Thoughts: Start Small, Build Gradually
You don't need to overhaul your entire bedside setup in one day. Start with the simplest solution that addresses your biggest frustration — usually a cable box or under-nightstand tray. Live with it for a week. Then add the next component. This incremental approach lets you identify what actually works for your routine and avoids wasted purchases.
The goal isn't perfection — it's a bedside area that supports your daily life without adding stress. A place where your phone charges reliably, your lamp is easy to reach, and you're not tripping over cables in the dark. With the strategies in this guide, that goal is absolutely achievable.
For more guidance on every aspect of nightstand selection and setup, explore our nightstand starter hub — your central resource for building the perfect bedside setup.